How to Create an Online Obituary: Step-by-Step Memorial Guide

Creating an online obituary is a beautiful way to honor your loved one’s life, share memories, and bring family and friends together.
Through Altogether’s online platform, you can create a memorial page that serves as a lasting tribute. Below is a clear, step-by-step guide that walks you through the process.
Step 1: Begin a New Memorial Page
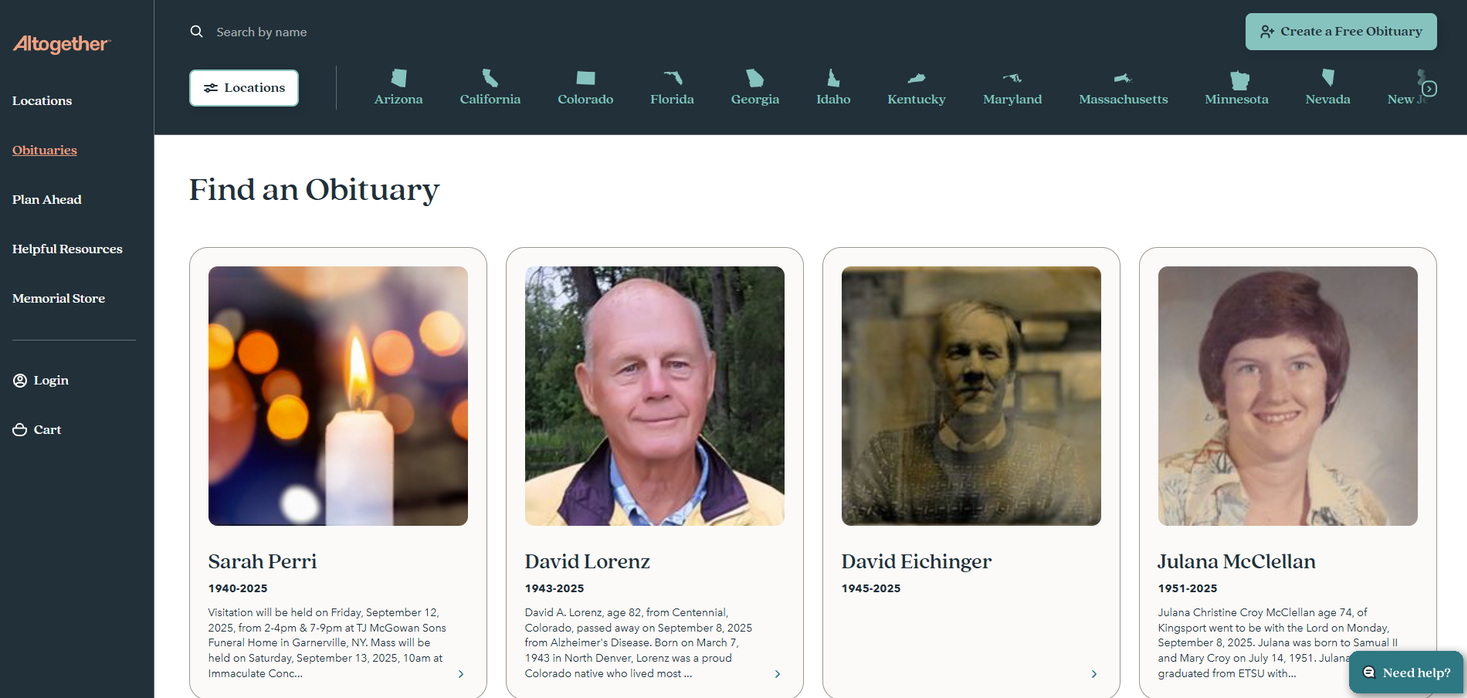
1. Visit Altogether.
2. Click on Obituaries and “Create a Memorial Page.”
3. Log in or sign up if you don’t have an account. Or, you can continue with Google.
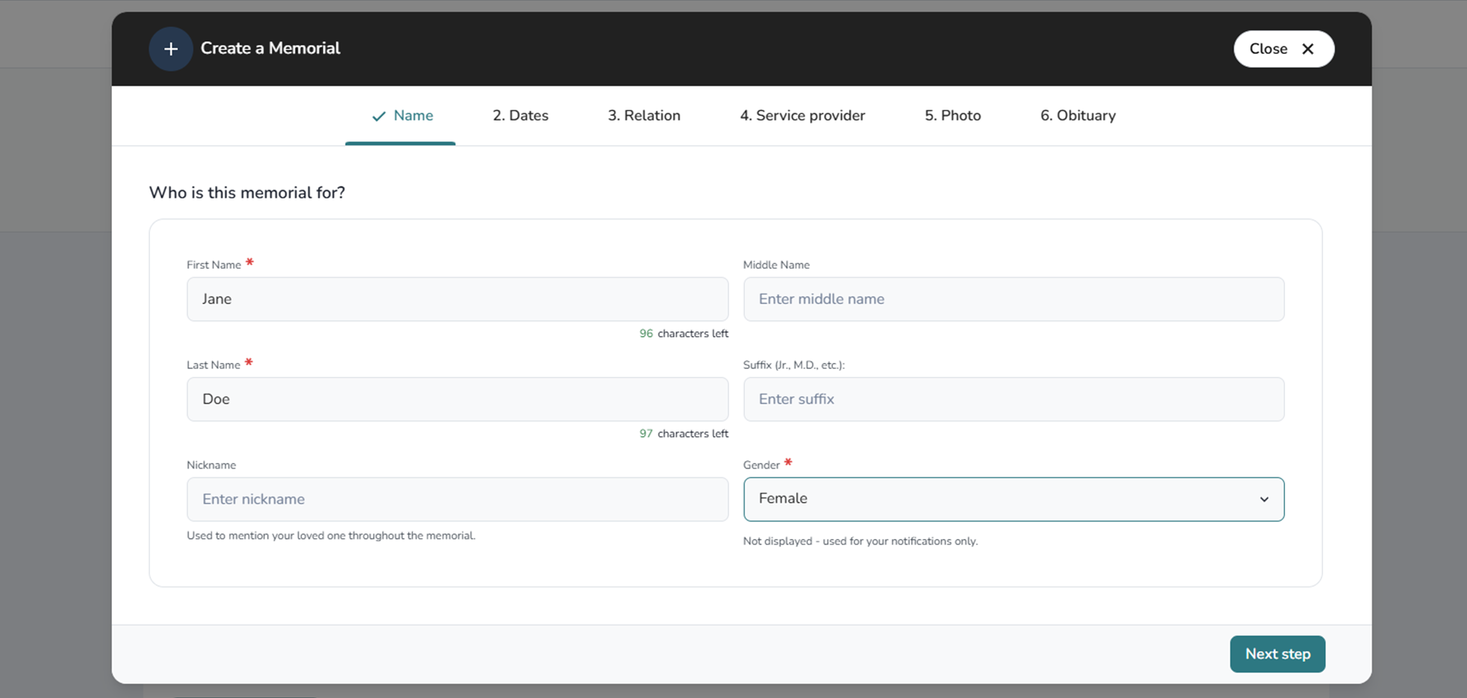
4. Enter the required information:
- First name and last name
- Gender
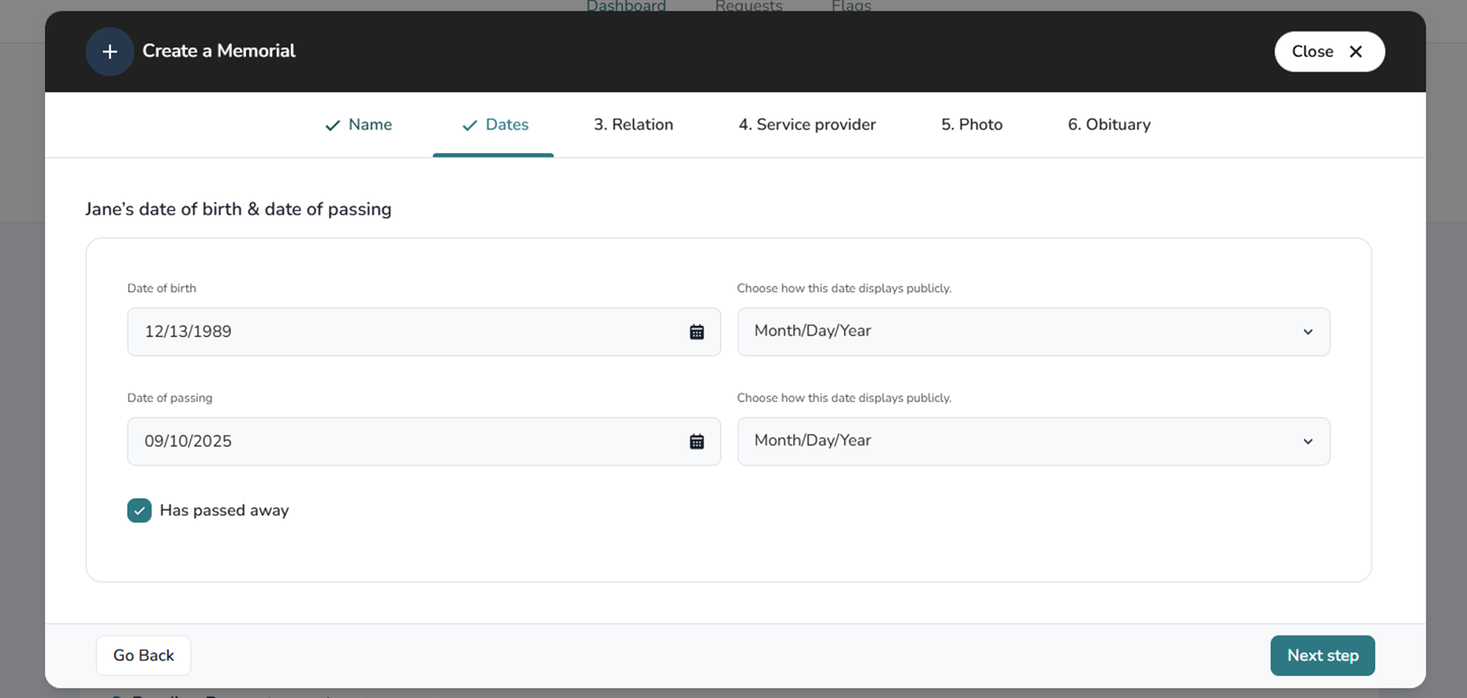
5. (Optional) Add date of birth and date of passing. If your loved one has passed, check the box marked “Has Passed Away.”
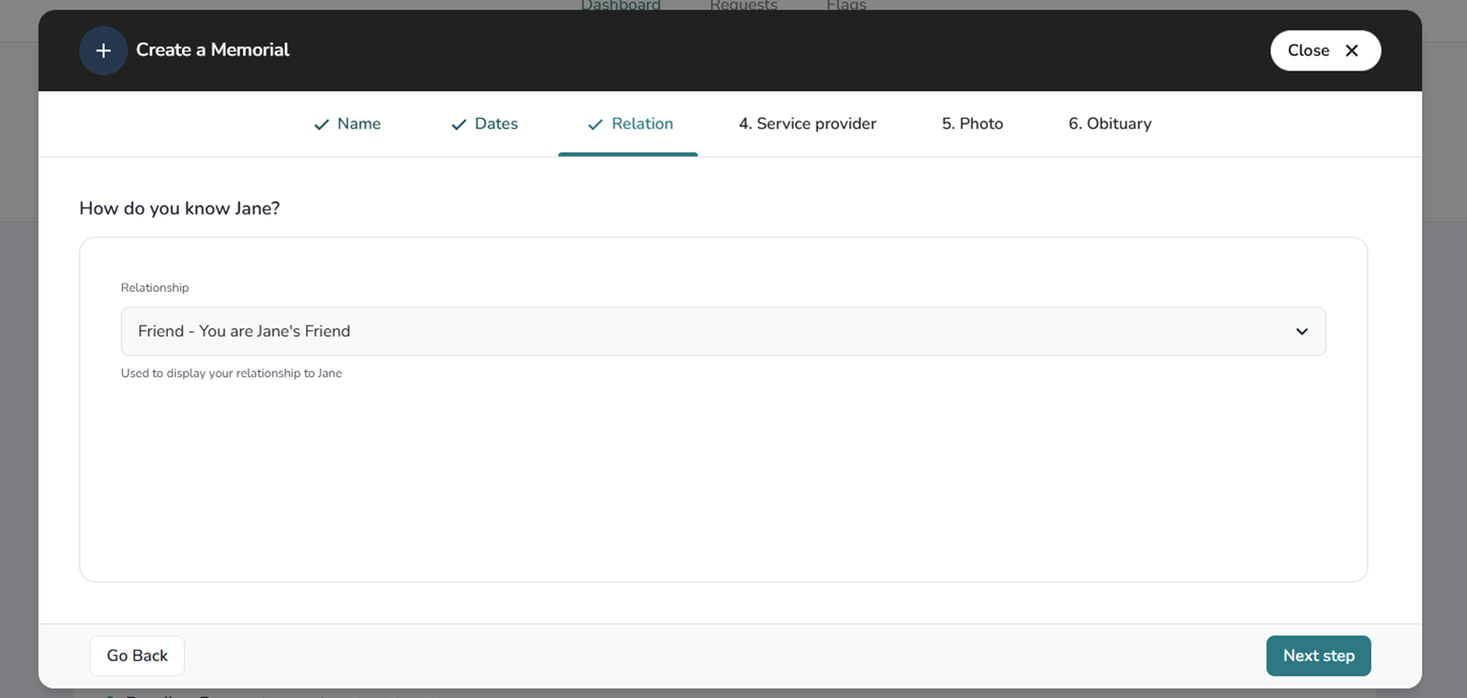
6. (Optional) Select a relationship from the drop-down list or create a custom one.
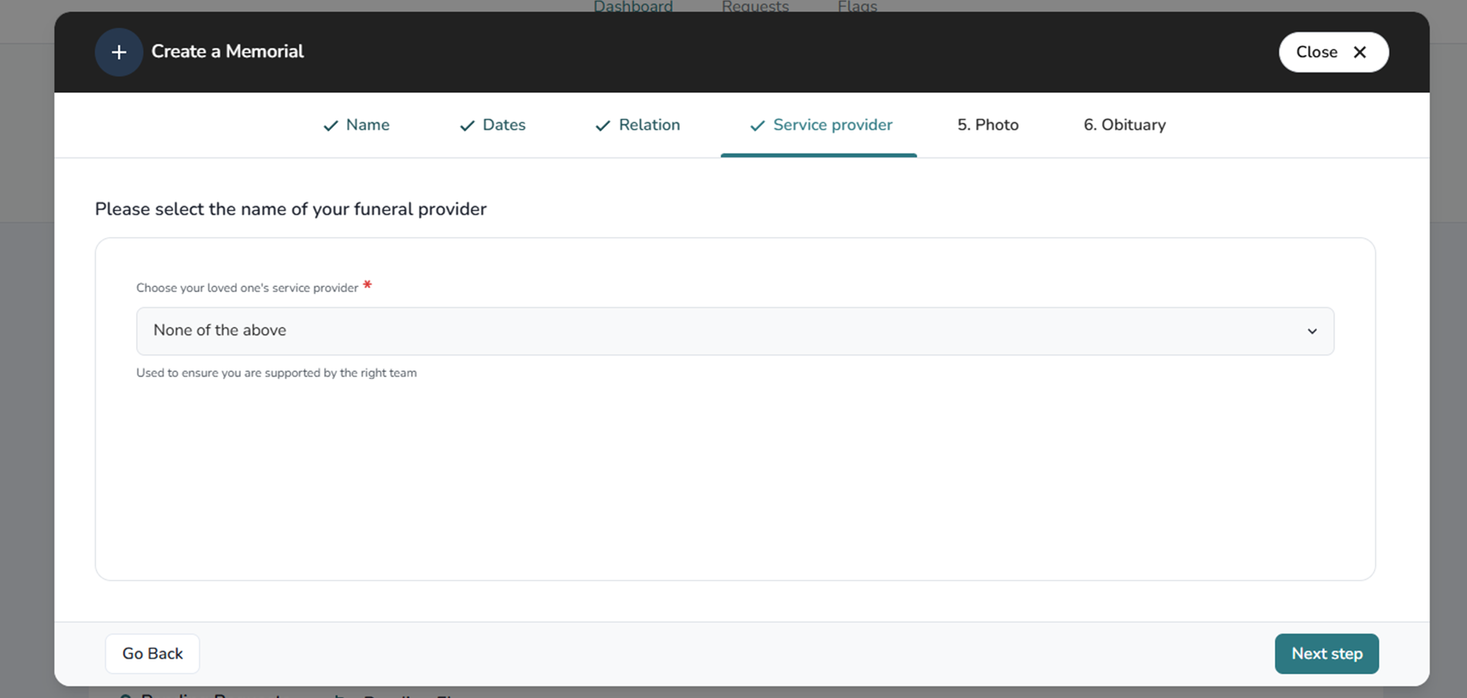
7. Choose your loved one’s funeral service provider from the drop-down list. If they’re not an option, please select “None of the above.”

Step 2: Add Photos, Words, and Details
Personal touches make the page meaningful. Here’s how to add them:
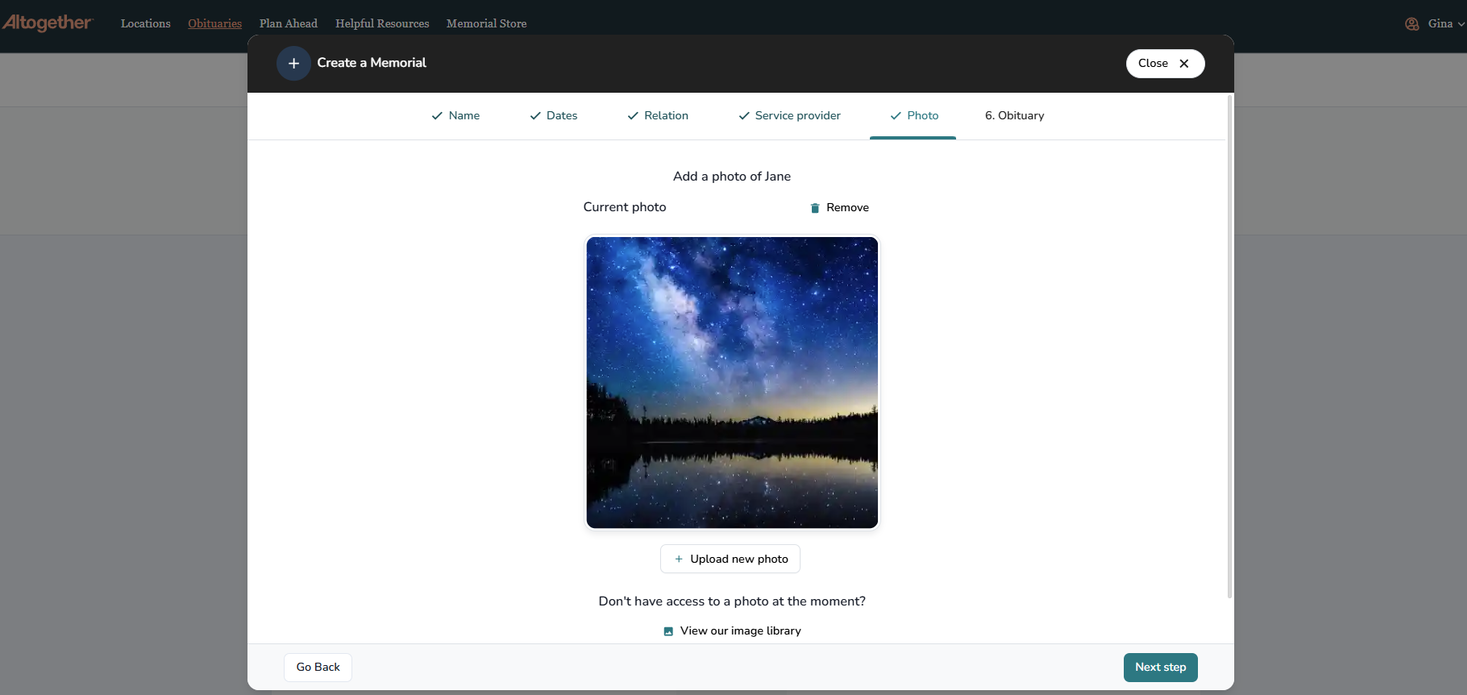
- Upload a photo: Choose a favorite image of your loved one. You can upload one directly or select from the image library.
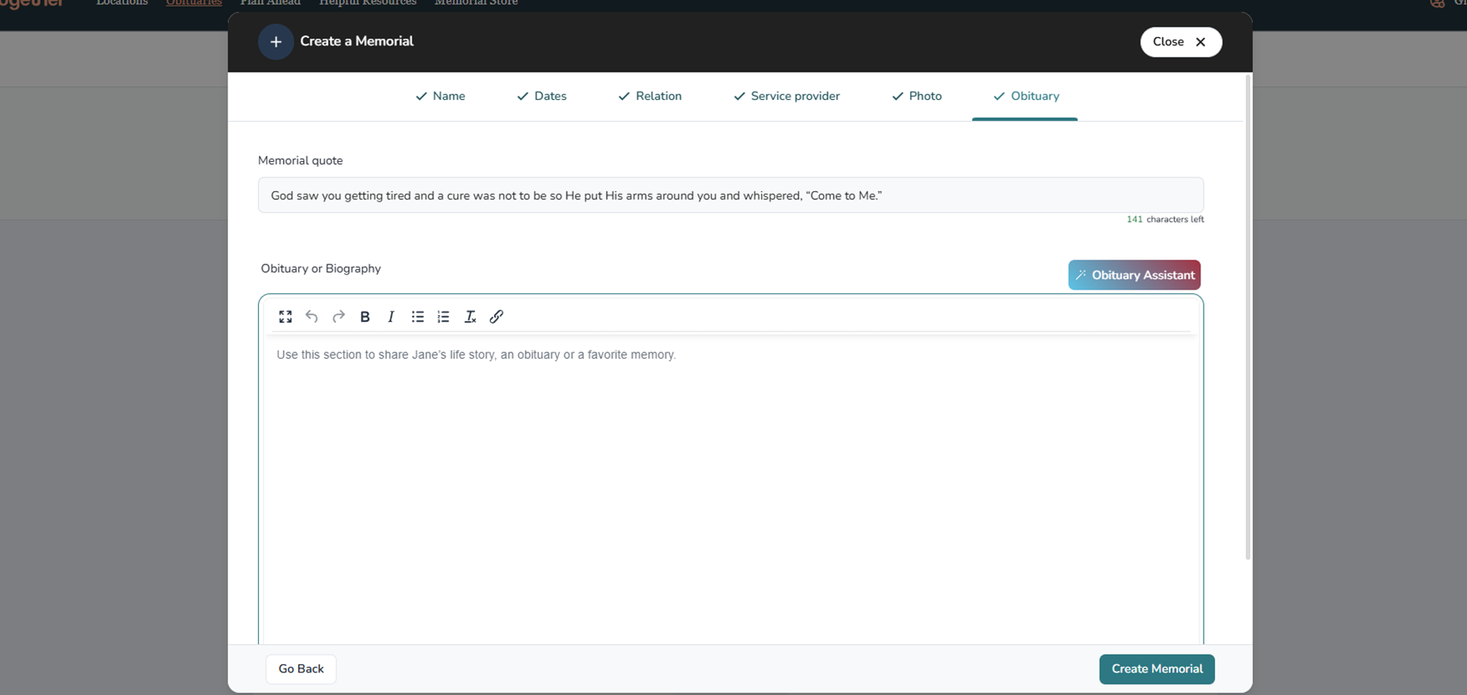
- Add a meaningful quote: Many families choose to include a Bible verse, a favorite saying, or words that reflect their loved one’s spirit. This text will appear in a large font above the biography section. There is a 250-character limit.
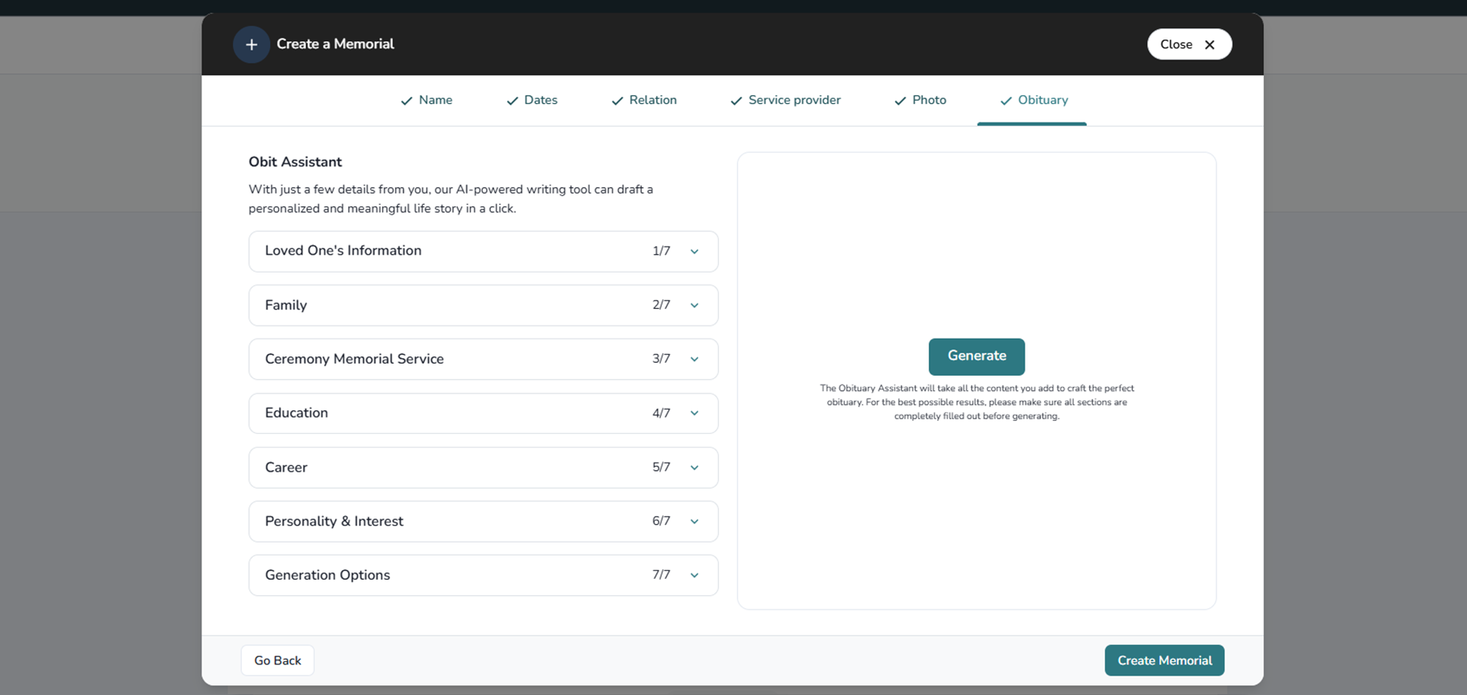
- Write the obituary text: Share your loved one’s story, highlight their passions, and reflect on the memories that mattered most. If you’d like help, you can use the built-in Obituary Assistant for writing prompts and suggestions. If you’re using the Obituary Assistant, enter the details you’d like to include in each section, and once you’re done, click “Generate.” To use the text the assistant generated, scroll down and click on “Add to Obituary.” After adjusting the spacing and words, click “Create Memorial.”
Step 3: Customize the Memorial Page
Every life is unique, so your loved one’s memorial page can be, too.
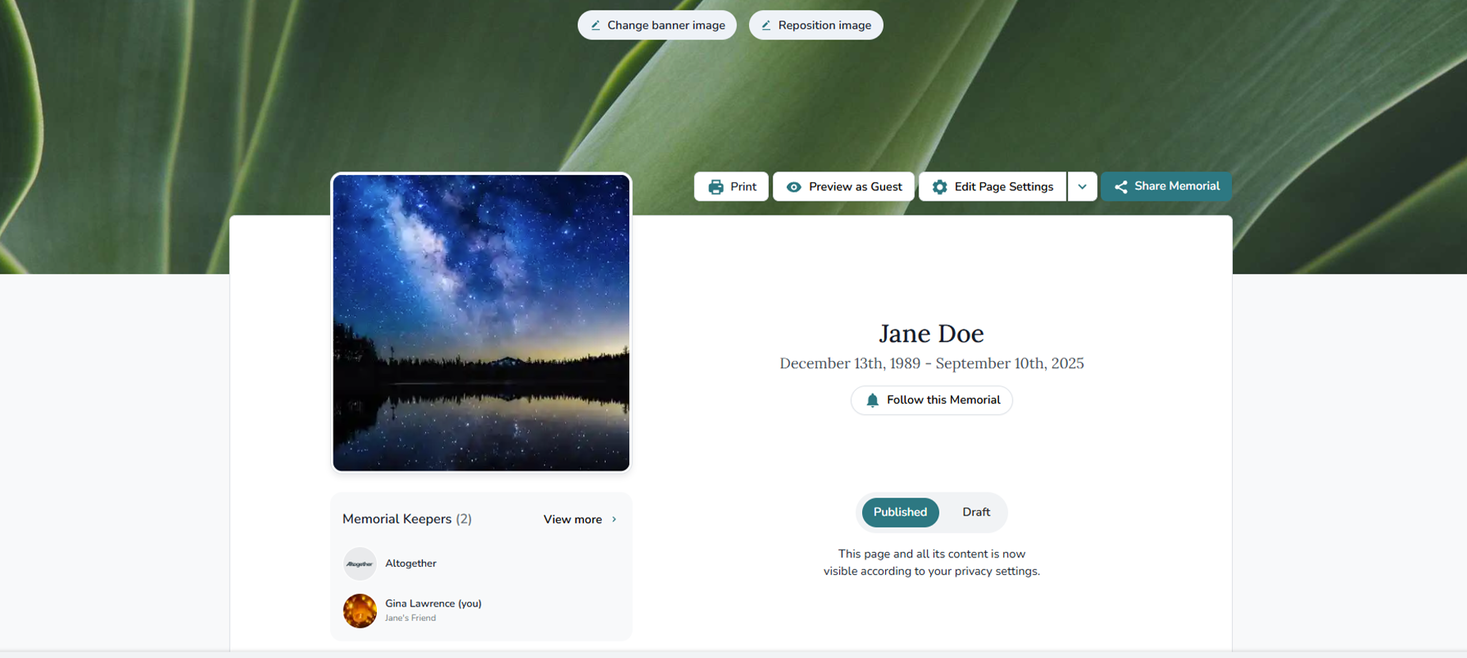
- Change the banner image: Hover over the banner at the top and click “Change banner image.” Upload your own, choose from mementos, or select from the image library.
- Reposition the banner: Click “Reposition image” and drag until it looks right.
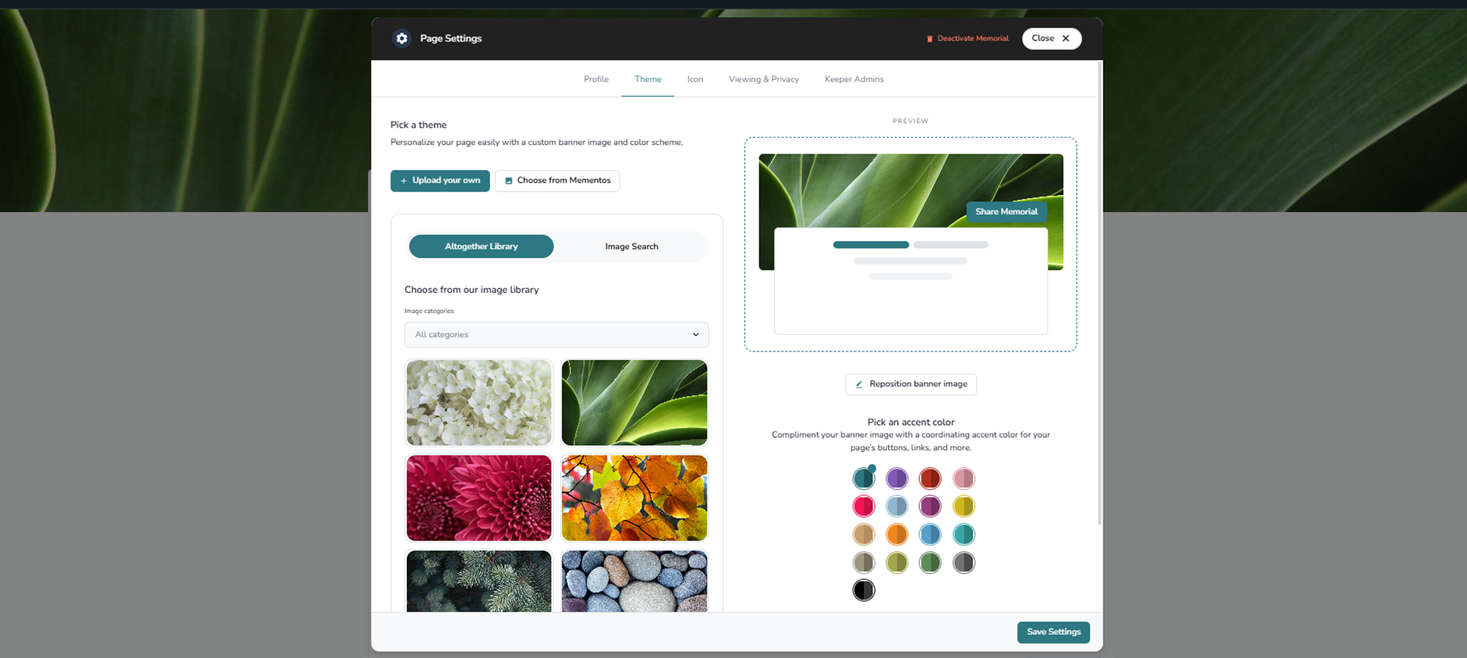
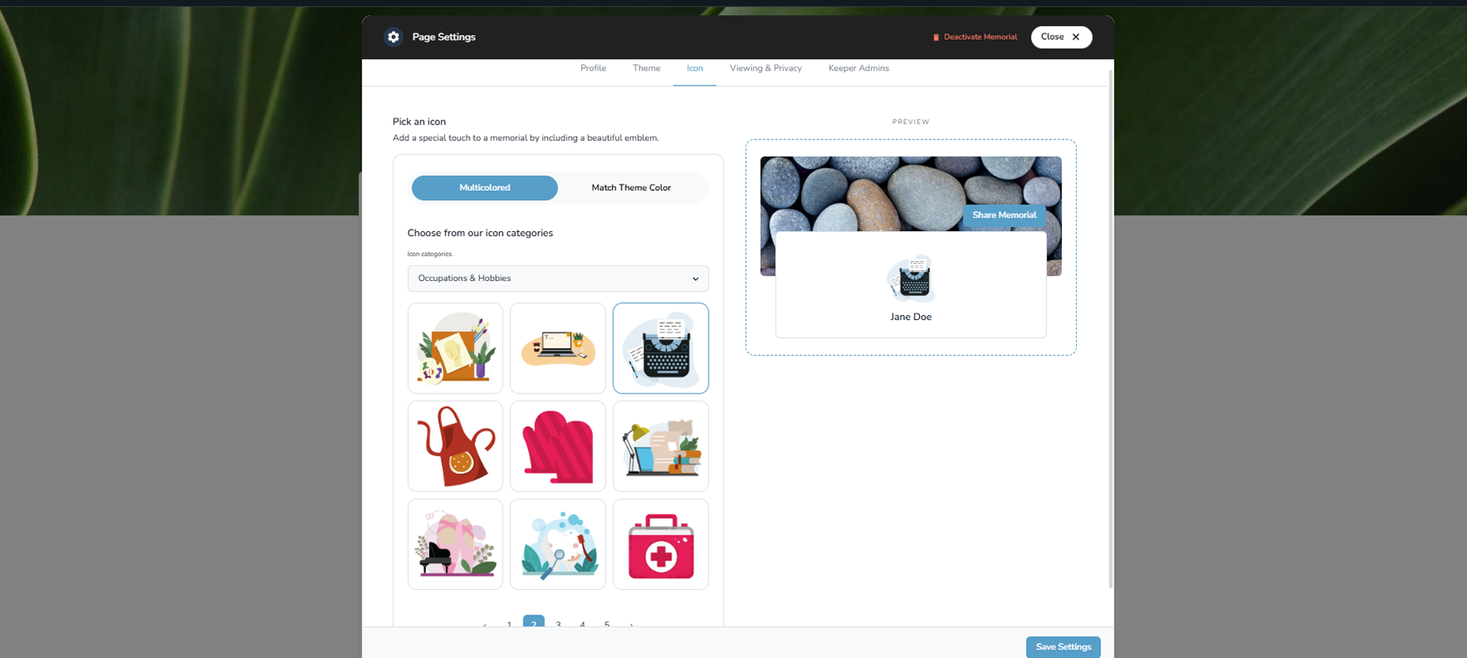
- Adjust design settings: Under Page Settings, you can update the accent color (teal is the default) and choose an icon that appears above your loved one’s name.
Step 4: Invite Family Members to Help
You don’t have to create the obituary alone. You can give other family members access to contribute by inviting them to become Memorial Keepers.
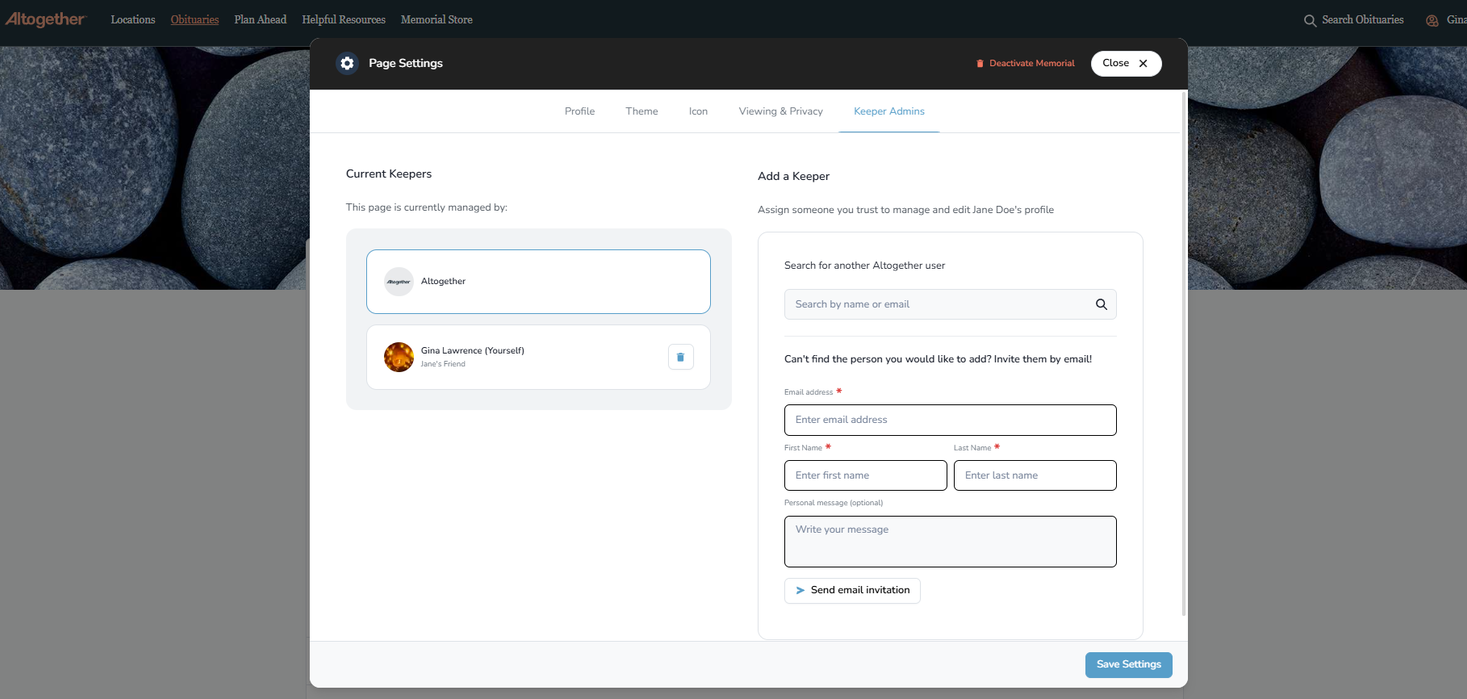
- On the memorial page, click “Edit Page Settings.”
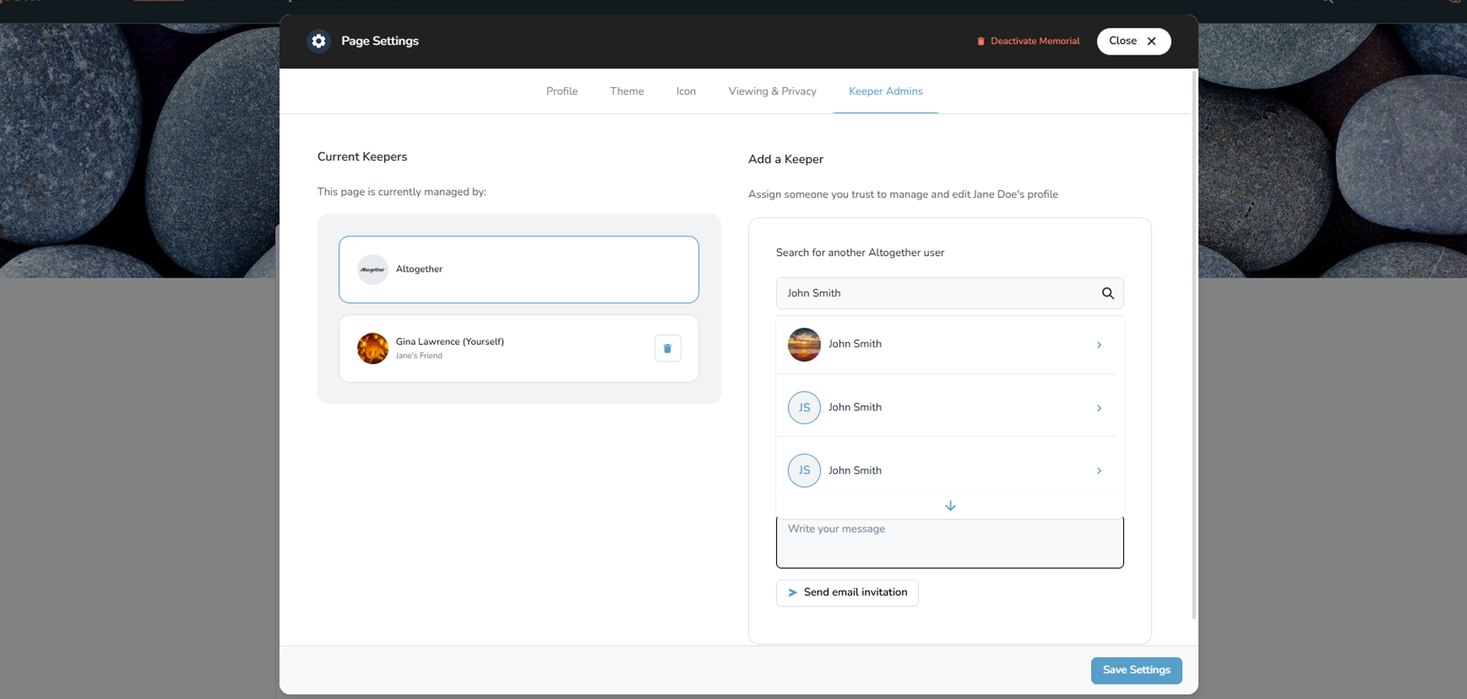
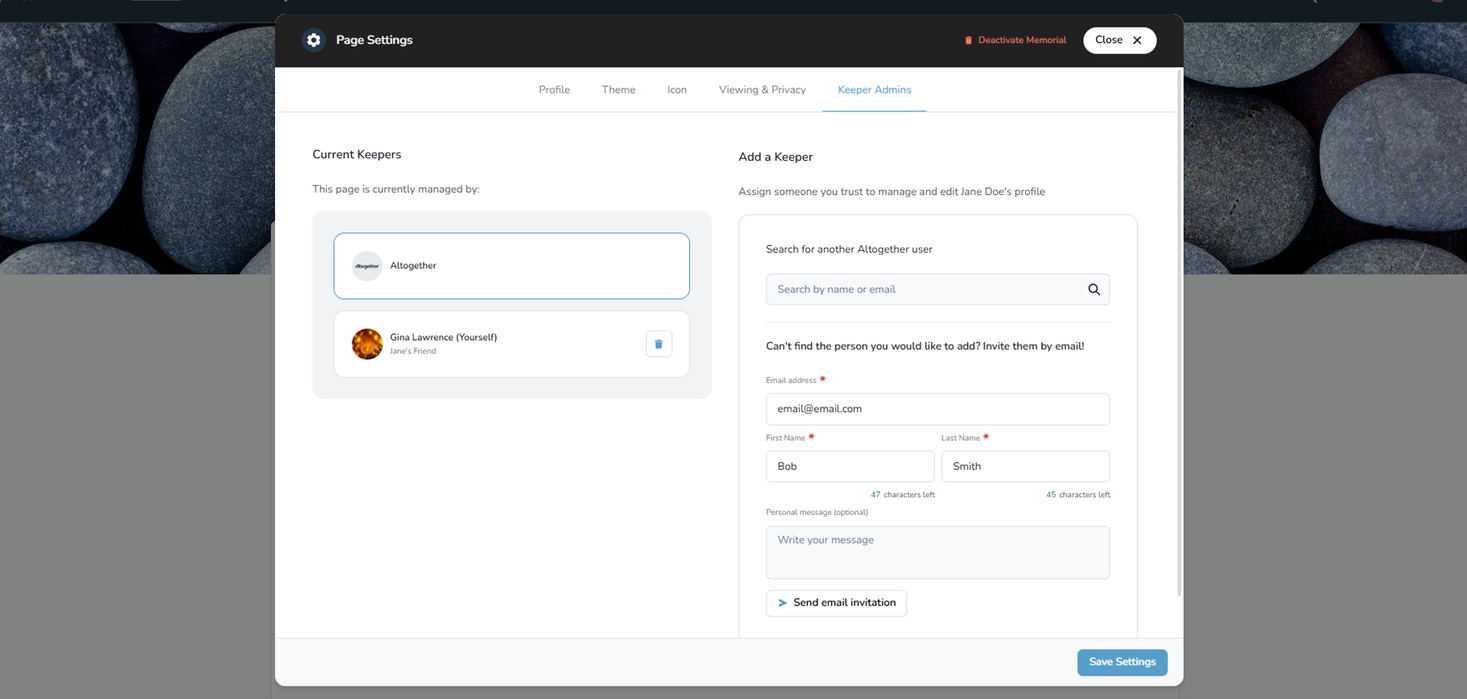
- Go to the tab titled Keeper Admins.
- Search by their name or email if they have an Altogether account already, or send an invitation by entering their full name and email address.
- They’ll receive an email invitation to join and can then help edit and manage the page.
Step 5: Share the Obituary
Once the page feels complete, you can share it widely so others can celebrate and remember your loved one.
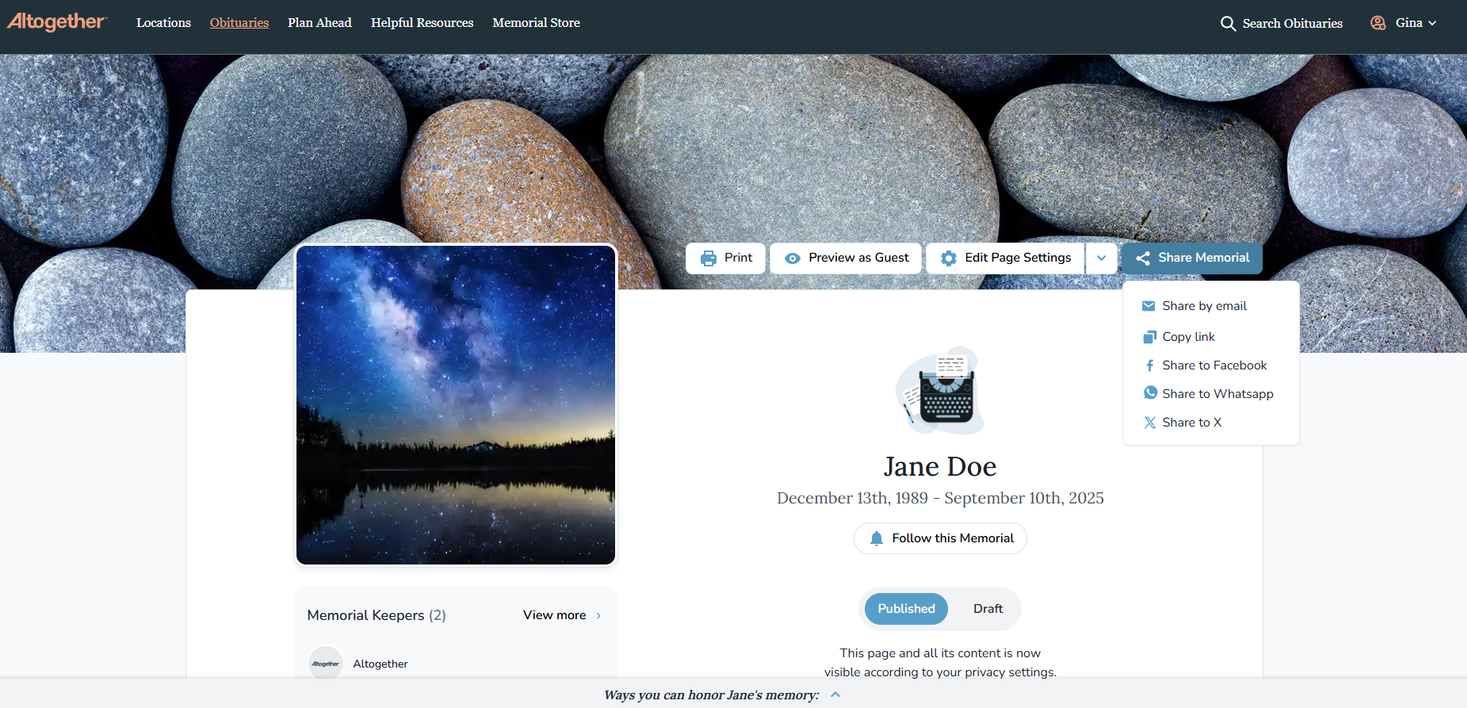
- Share directly: Use the Share Memorial button to send by email, copy a link, or post to Facebook, WhatsApp, or X (formerly known as Twitter).
- Save or print: Click “Print” to generate a PDF copy. You can also right-click and select “Save as PDF.”
Step 6: Preview the Page as a Guest
Before sharing with friends and family, you can see what the page will look like to visitors.
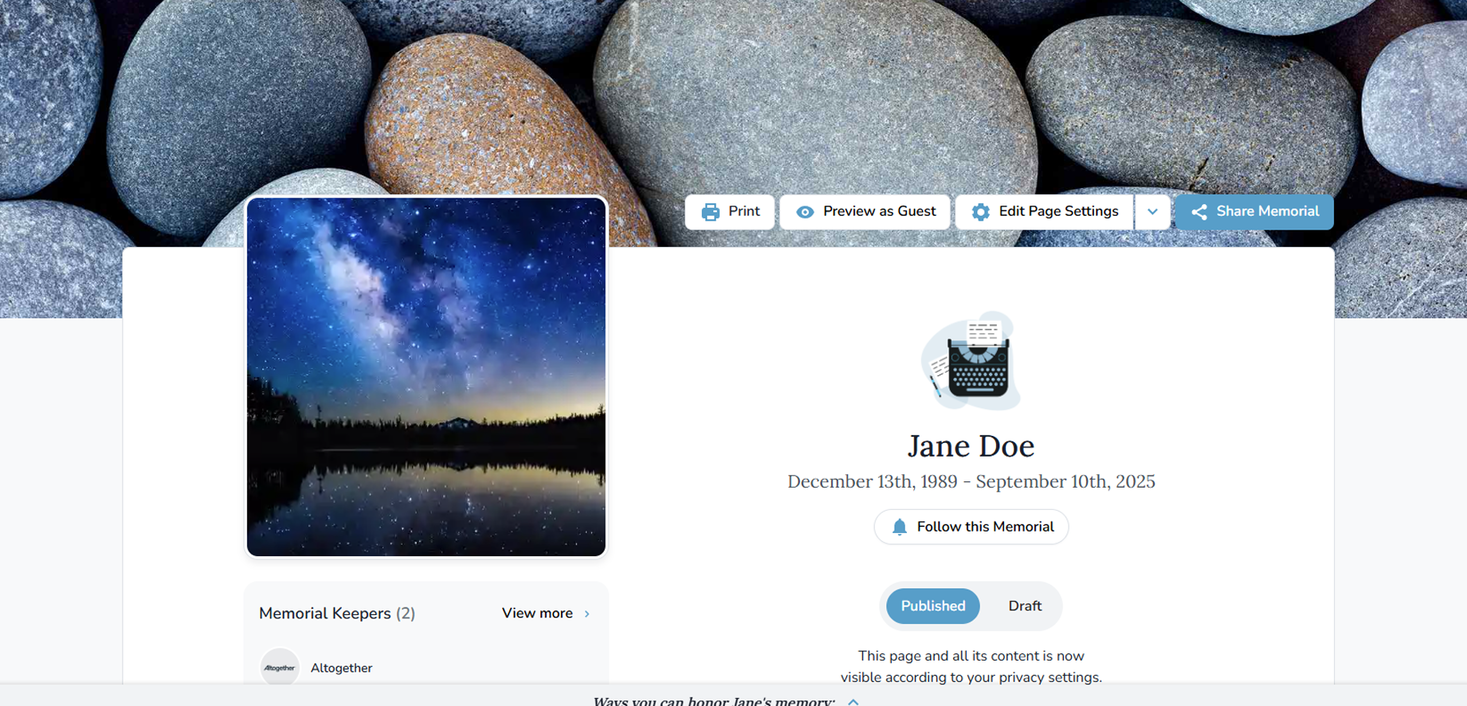
- Click “Preview as Guest.”
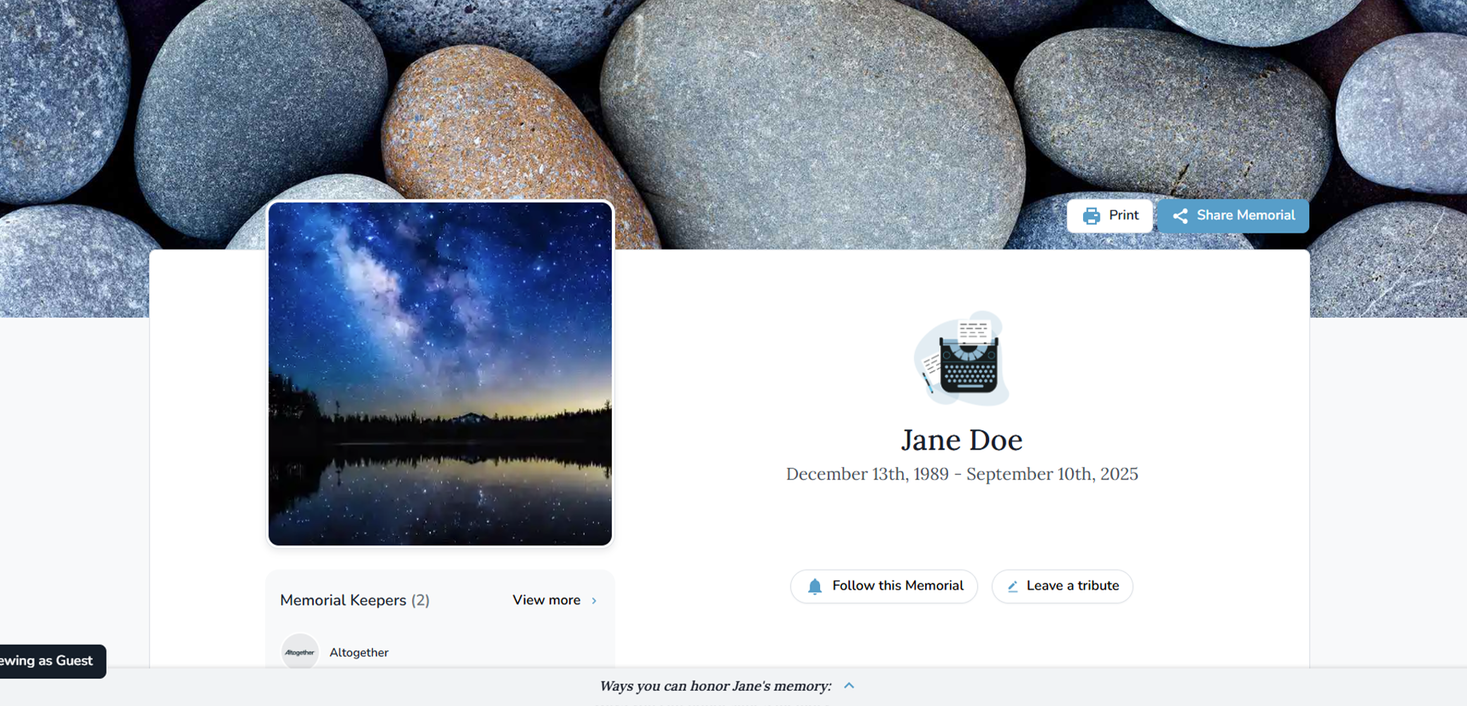
- A new tab will open showing the public version. You’ll also see a “Viewing as Guest” message on the bottom left corner of the screen. Close the tab to return to editing.
Frequently Asked Questions about Creating an Obituary
Q: How long does it take for the obituary to appear on the funeral home’s location page?
New obituaries usually appear within an hour, and always by the end of the day. But they will be visible under the main Obituaries tab right away.
Q: Can I make changes later?
Yes. You can update photos, text, dates, or design details at any time by going to your Obituary Dashboard, opening the obituary, and clicking on the section you’d like to edit.
Q: Can I remove a memorial page?
Yes. From the Edit Page Settings menu, click “Deactivate Memorial” and confirm by typing DELETE and clicking Deactivate.
Q: Can I change the colors or images?
Absolutely. Accent colors, banners, and photos can be updated at any time under Edit Page Settings and the Mementos tab.
Q. Do I write an obituary for a Veteran the same as for another loved one?
You write a veteran’s obituary much the same way, but be sure to include their military service, honors, and branch. Here’s an article that can help.
Online Obituaries Let You Share Memories
Our free online obituary program allows you to view and share memories with friends and family worldwide. You can personalize the tribute and update it to include new memories or additional family stories. Having an online memorial is part of keeping their memory alive, just as a funeral or life celebration, or planting a memorial tree.
And remember: your local funeral provider is always available to help. If you’d prefer, they can walk you through the process or even create the online obituary with you, so you don’t have to do it alone.
- Apopka
- Auburndale
- Belleview
- Bradenton
- Brevard County
- Cape Coral
- Charlotte County
- Clewiston
- Cocoa Beach
- Collier County
- Daytona Beach
- Deltona
- Englewood
- Fort Myers
- Haines City
- Hendry County
- Hillsborough County
- Kissimmee
- LaBelle
- Lady Lake
- Lake County
- Lakeland
- Land O' Lakes
- Largo
- Lee County
- Manatee County
- Marco Island
- Marion County
- Melbourne
- Naples
- New Smyrna Beach
- North Port
- Ocala
- Orange County
- Orlando
- Ormond Beach
- Palm Bay
- Palm Coast
- Pasco County
- Pinellas County
- Polk County
- Port Charlotte
- Port Orange
- Punta Gorda
- Rockledge
- Sanford
- Sarasota
- Sarasota County
- Satellite Beach
- Sebastian
- Seminole
- St. Petersburg
- Sumter County
- Sun City Center
- Tampa
- Tavares
- The Villages
- Titusville
- Venice
- Volusia County
- Wildwood
- Winter Haven
- Winter Park
- Afton
- Andover
- Apple Valley
- Arden Hills
- Barnum
- Bayport
- Belle Plaine
- Bethel
- Big Lake
- Birchwood Village
- Blaine
- Bloomington
- Brooklyn Center
- Brooklyn Park
- Brookston
- Buffalo
- Burnsville
- Carlton
- Carlton County
- Carver
- Centerville
- Chanhassen
- Chaska
- Chisago City
- Circle Pines
- Cloquet
- Coates
- Cologne
- Columbia Heights
- Columbus
- Corcoran
- Cottage Grove
- Cromwell
- Crystal
- Dakota County
- Dayton
- Deephaven
- Delano
- Dellwood
- Duluth
- Eagan
- East Bethel
- Eden Prairie
- Edina
- Elko New Market
- Elk River
- Excelsior
- Falcon Heights
- Farmington
- Forest Lake
- Fridley
- Gem Lake
- Golden Valley
- Grant
- Greenfield
- Greenwood
- Ham Lake
- Hampton
- Hanover
- Hastings
- Hennepin County
- Hermantown
- Hilltop
- Hopkins
- Hugo
- Inver Grove Heights
- Jordan
- Lake Elmo
- Lakeland
- Lakeland Shores
- Lake Saint Croix Beach
- Lakeville
- Landfall
- Lauderdale
- Lexington
- Lilydale
- Lindström
- Lino Lakes
- Little Canada
- Long Lake
- Lonsdale
- Loretto
- Mahtomedi
- Maple Grove
- Maple Plain
- Maplewood
- Medicine Lake
- Medina
- Mendota
- Mendota Heights
- Miesville
- Minneapolis
- Minnetonka
- Minnetonka Beach
- Monticello
- Moose Lake
- Mound
- Mounds View
- New Brighton
- New Hope
- Newport
- New Prague
- New Trier
- North Oaks
- North St. Paul
- Nowthen
- Oakdale
- Oak Grove
- Oak Park Heights
- Orono
- Osseo
- Otsego
- Pine Springs
- Plymouth
- Prior Lake
- Ramsey
- Ramsey County
- Randolph
- Rockford
- Rogers
- Rosemount
- Roseville
- Saint Louis County
- Saint Louis Park
- Saint Mary's Point
- Savage
- Scandia
- Scanlon
- Shakopee
- Shoreview
- Shorewood
- South Saint Paul
- Spring Lake Park
- Spring Park
- St. Anthony
- St. Bonifacius
- St. Francis
- St. Paul
- St. Paul Park
- Stacy
- Stillwater
- Sunfish Lake
- Tonka Bay
- Vadnais Heights
- Vermillion
- Victoria
- Waconia
- Watertown
- Wayzata
- West St. Paul
- White Bear Lake
- Willernie
- Woodbury
- Woodland
- Wrenshall
- Alhambra
- Aliso Viejo
- Amador City
- Amador County
- American Canyon
- Anaheim
- Angels Camp
- Antioch
- Arcadia
- Artesia
- Auburn
- Baldwin Park
- Berkeley
- Biggs
- Bradbury
- Brea
- Brentwood
- Buena Park
- Butte County
- Capitola
- Carmel-by-the-Sea
- Carpinteria
- Chico
- Chino
- Claremont
- Colusa
- Compton
- Concord
- Contra Costa County
- Costa Mesa
- Covina
- Cupertino
- Cypress
- Davis
- Del Rey Oaks
- Diamond Bar
- Dixon
- Downey
- Duarte
- Dublin
- East Palo Alto
- El Dorado County
- Elk Grove
- El Monte
- Fairfield
- Fontana
- Fountain Valley
- Fremont
- Fullerton
- Galt
- Gardena
- Garden Grove
- Gilroy
- Glendora
- Gonzales
- Half Moon Bay
- Hayward
- Hollister
- Ione
- Irvine
- Irwindale
- Isleton
- Jackson
- Laguna Hills
- Laguna Niguel
- Laguna Woods
- La Habra
- Lake Forest
- Lakewood
- La Mesa
- La Palma
- Larkspur
- Lathrop
- Lincoln
- Livermore
- Lodi
- Los Altos
- Manteca
- Marina
- Martinez
- Milpitas
- Mission Viejo
- Modesto
- Monrovia
- Montclair
- Monterey
- Monterey County
- Monte Sereno
- Mountain View
- Napa
- Newark
- Norco
- Norwalk
- Oakdale
- Oakland
- Ontario
- Orange
- Orange County
- Orland
- Oroville
- Pacific Grove
- Palo Alto
- Pine Grove
- Pioneer
- Placentia
- Placer County
- Placerville
- Plymouth
- Pomona
- Rancho Cucamonga
- Rancho Santa Margarita
- Redwood City
- Richmond
- Rio Vista
- Ripon
- Rocklin
- Roseville
- Sacramento
- Sacramento County
- Salinas
- San Buenaventura
- San Carlos
- Sand City
- San Diego County
- San Dimas
- San Francisco
- San Gabriel
- San Joaquin County
- San Jose
- San Juan Bautista
- San Juan Capistrano
- San Leandro
- San Mateo
- San Mateo County
- Santa Ana
- Santa Barbara
- Santa Barbara County
- Santa Clara
- Santa Clara County
- Santa Cruz
- Santa Cruz County
- Santa Fe Springs
- Saratoga
- Scotts Valley
- Seaside
- Signal Hill
- Soledad
- Soquel
- South Gate
- South San Francisco
- Stanton
- Stockton
- Suisun City
- Sunnyvale
- Sutter County
- Sutter Creek
- Tehama
- Temple City
- Tracy
- Tustin
- Upland
- Vallejo
- Villa Park
- Walnut
- Walnut Creek
- Watsonville
- West Covina
- Westminster
- Whittier
- Willows
- Woodland
- Yorba Linda
- Yuba City
- Albany
- Amsterdam
- Beacon
- Canajoharie
- Clifton
- Englewood
- Fulton County
- Fultonville
- Garfield
- Garnerville
- Glen Cove
- Gloversville
- Hackensack
- Haverstraw
- LaFayette
- Montgomery County
- Newburgh
- New Rochelle
- New York
- Onondaga County
- Paterson
- Peekskill
- Rockland County
- Rye
- Schenectady
- Syracuse
- White Plains
- Yonkers
- Auburn
- Bellevue
- Bothell
- Brier
- Carnation
- Centralia
- Clyde Hill
- Duvall
- Edmonds
- Everett
- Federal Way
- Granite Falls
- Issaquah
- Kenmore
- Kent
- King County
- Kirkland
- Lacey
- Lakewood
- Langley
- Lewis County
- Lynnwood
- Marysville
- Medina
- Mercer Island
- Mill Creek
- Mountlake Terrace
- Mukilteo
- Newcastle
- Normandy Park
- Oak Harbor
- Oakville
- Olympia
- Pierce County
- Poulsbo
- Puyallup
- Redmond
- Sammamish
- Seattle
- Snohomish
- Snohomish County
- Sumner
- Tacoma
- Thurston County
- Tukwila
- Tumwater
- University Place
- Woodinville
- Woodway
- Adams County
- Arapahoe County
- Arvada
- Aurora
- Boulder
- Boulder County
- Brighton
- Castle Pines
- Cherry Hills Village
- Colorado Springs
- Commerce City
- Dacono
- Denver
- Douglas County
- El Paso County
- Evans
- Fort Collins
- Fort Lupton
- Fountain
- Glendale
- Golden
- Greeley
- Greenwood Village
- Jefferson County
- Lafayette
- Lakewood
- Larimer County
- Littleton
- Lone Tree
- Longmont
- Louisville
- Loveland
- Northglenn
- Parker
- Weld County
- Wellington
- Westminster
- Wheat Ridge
- Windsor
- Archdale
- Asheboro
- Belmont
- Bessemer City
- Burlington
- Charlotte
- Claremont
- Concord
- Conover
- Forsyth County
- Graham
- Greensboro
- Guilford County
- Hickory
- High Point
- Iredell County
- Kernersville
- King
- Lexington
- Locust
- Lowell
- Mecklenburg County
- Monroe
- Mount Holly
- Newton
- Randleman
- Rock Hill
- Salisbury
- Statesville
- Tega Cay
- Thomasville
- Trinity
- Winston-Salem